Uploading SSL certificate to Azure Application gateway
Convert SSL to pfx format and upload it to Azure Application Gateway


Azure support pfx format for SSL certificates. The certificates that you might have received from your SSL provides will probably be in the .cert format. To convert it and upload, follow this blog
Certificate conversion
To convert the certificate, first combine the domain certificate and the intermediate certificate to a single file
Your domain cert will look something like this
-----BEGIN CERTIFICATE-----
MIIFxTCCBK2gAwIBAgIMKKt3n8G02bLvUx5GMA0GCSqGSIb3DQEBCwUAMEwxCzAJ
BgNVBAYTAkJFMRkwFwYDVQQKExBHbG9iYWxTaWduIG52LXNhMSIwIAYDVQQD...
....
....
PnQbBuHnMqQWOPS1LHZAUf79MWGggNP+g00Y5Aw9jFhVBnv1flren2g=
-----END CERTIFICATE-----
Your intermediate certificate will look something like this
-----BEGIN CERTIFICATE-----
MIIETTCCAzWgAwIBAgILBAAAAAABRE7wNjEwDQYJKoZIhvcNAQELBQAwVzELMAkG
A1UEBhMCQkUxGTAXBgNVBAoTEEdsb2JhbFNpZ24gbnYtc2ExEDAOBgNVBAsT...
....
....
MTh89N1SyvNTBCVXVmaU6Avu5gMUTu79bZRknl7OedSyps9AsUSoPocZXun4IRZZUw==
-----END CERTIFICATE-----
Finally when you combine them, the file will look something like this
-----BEGIN CERTIFICATE-----
MIIFxTCCBK2gAwIBAgIMKKt3n8G02bLvUx5GMA0GCSqGSIb3DQEBCwUAMEwxCzAJ
BgNVBAYTAkJFMRkwFwYDVQQKExBHbG9iYWxTaWduIG52LXNhMSIwIAYDVQQD...
....
....
PnQbBuHnMqQWOPS1LHZAUf79MWGggNP+g00Y5Aw9jFhVBnv1flren2g=
-----END CERTIFICATE-----
-----BEGIN CERTIFICATE-----
MIIETTCCAzWgAwIBAgILBAAAAAABRE7wNjEwDQYJKoZIhvcNAQELBQAwVzELMAkG
A1UEBhMCQkUxGTAXBgNVBAoTEEdsb2JhbFNpZ24gbnYtc2ExEDAOBgNVBAsT...
....
....
MTh89N1SyvNTBCVXVmaU6Avu5gMUTu79bZRknl7OedSyps9AsUSoPocZXun4IRZZUw==
-----END CERTIFICATE-----
Save it to a cert+intermediate.cert file
Make sure you have your key also ready and let's assume it is named ssl-key.key
Now to convert it, use the following command in linux
openssl pkcs12 -export -out certificate.pfx -inkey 'ssl-key.key' -in 'cert+intermediate.cert'This will ask for password
Enter Export Password:
Verifying - Enter Export Password:
Enter a password - make sure to write it down somewhere because this will be required while uploading it to the application gateway.
You cannot put a blank password because Application gateway will not allow you to upload an SSL without a password.
Once that is done, you'll get a certificate.pfx file.
Uploading Certificate to Application Gateway
To upload the certificate, open the application gateway configuration page and open the listeners tab
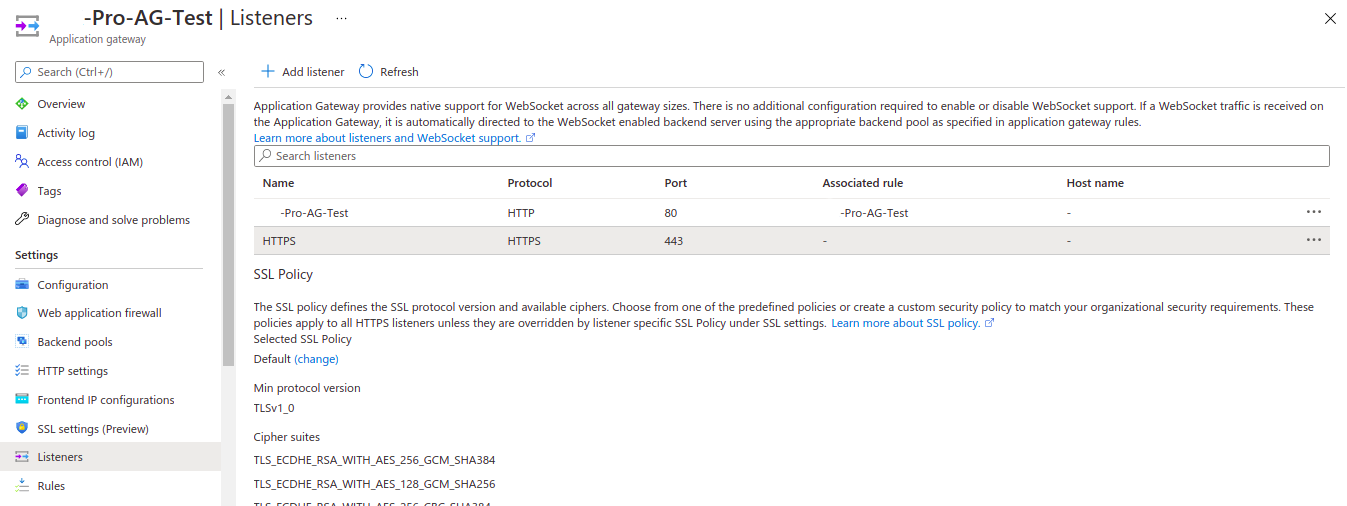
Here you can see the listeners. You should have created an SSL listener, if not create one and when it's opened, it will look like below.
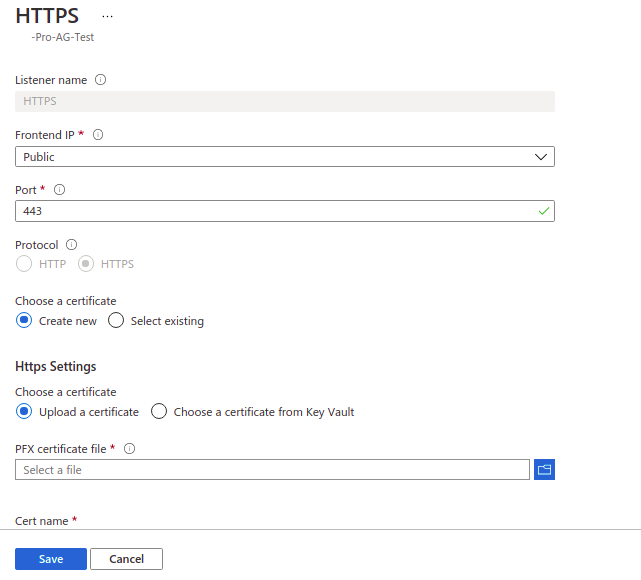
Here you can give all the listener configurations but we are only concerned with the Https Settings.
Scroll down to see the Https Settings
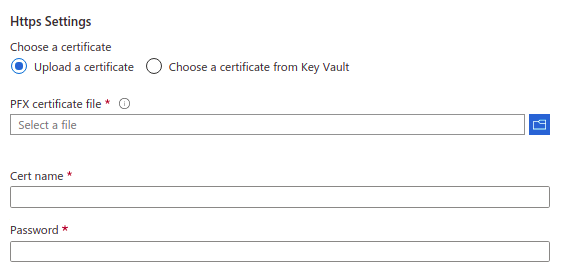
Select Upload a certification
Select the .pfx certificate file that we created previously name certificate.pfx
Give a suitable name for the certificate and enter the password that we had given during the conversion process.
If you YOLO-ed the "write the password down" instruction, don't worry, you can repeat the conversion step again enter the password this time.
Once that is done, hit save and your listener will start serving the SSL certificate
Note: Make sure you have the rule set up for that listener to forward the connection to the backen pool, otherwise you'll get a connection timeout error